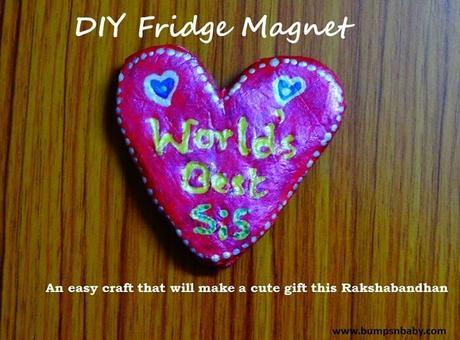
Is your little one wondering what to get his sister this rakhi?
Searched high and low and yet to find the perfect rakhi gift?
Here is a really easy gift that you can make at home. (The bonus - there won't be a big dent in his or your piggy bank at the end of it).
Presenting the world's best sister fridge magnet. This is something you and your child can make together and it is sure to bring a smile on the face of whoever it is intended for.

Do not forget to checkout these DIY Rakhi Ideas for some really easy tutorials to make some really cute rakhis.
Not an artist?Do not worry, this is some really basic level stuff. All you need is some easily available materials, basic knowledge of maths and to brush up on painting that you did in primary school. If you were really weak at it then your kid can do it for you.
DIY fridge magnet - Step by step instructions:
- M-Seal
- Fevicryl Acrylic Paint ( I used their pearl kit)
- Paint brush
- Toothpick
- Magnet - I purchased mine from a hobby shop in Bangalore
- Heavy duty glue- I used Fevibond
- Varnish or Mod Podge
Clear out the area where you will be working with M Seal. When you open the M seal packet you see two different packets. One is the resin base and the other is the hardener.
Take the same quantity of both. Take only what is required as this will harden fast. Mix both well. Once it is mixed it turns a glossy black color. I used a plastic bag at this point to help me knead and get the figure ready without sticking to my desk. Beginners should try this as this can get a bit tricky.
Once you get the desired shape, you can move on to the next step. Use a toothpick to etch out the message. This will help you write the paint the message after painting the heart.
Allow your masterpiece to dry. Paint it with the color you like. Once the base is dry, you can decorate it further by writing the message and adding some designs. I added some dots along the sides and two hearts. Let it dry and give a coat of clear varnish or mod podge.
Once that too has dried you can stick the magnet. That's all folks.
Precautions:Though it is a good substitute for air dry clay, M Seal tends to dry and set fast due to what it is originally intended for - fix and repair. So make sure you work fast or else you won't be able to finish your project the way you like that you like it. Start with smaller shapes and later who knows may be putting stalwarts to shame.
The magnet should be strong enough to hold up the M seal shape, if the shape is big and heavy and the magnet is small, it will just slide down. If you have small magnets then use two.
Make sure to wash the hands of your kid thoroughly if he has helped you mixing the m-seal.
Do try it out as it is a great activity to bond with your children. Let me know how it went and how you decorated your magnet, in the comments.
Happy Crafting and Happy Rakshabandan!
