 It's no secret that it's getting cooler 'down here' in Australia... but warmer everywhere else! So while I'm crafting Autumn Hats with my preschooler, I'm also thinking 'Spring' for the rest of you... and as I'm always playing around with cupcake liners, posting about how to use them for everything from snowflakes, cherry-blossoms, table-settings, mirrors, bunting, and happy clam party craft projects that you can make with them, I've come up with another, more complicated flower for you to try.
You'll need;
- Coloured patty pans (bigger is best).
- Scissors and glue.
- Coloured sticky dots.
Here's what to do;
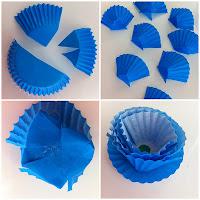
- Cut a coloured patty pan in half, and then quarters.
- Snip the round base of each quarter, up to where the ribbed side starts.
- Fold the cut ends over each other and glue in place (you'll end up with a shell shape).
- Repeat steps 1-3 with a second patty pan (you'll now have 8 'petal-shells').
- Leave all the petal-shells aside to dry completely.
- Slowly start to glue one petal-shell on top of the other (coloured side out), growing ever larger until you have used all 8 pieces (the photo shows the massed shape from underneath - don't worry if it looks uneven).
- Glue the flower onto an uncut patty pan.
- Add a coloured sticky dot to the center.

